Who can realistically complete this? Homeowners with some HVAC familiarity and comfort around sheet metal tools. For commercial systems or complex residential configurations, a licensed HVAC technician is the right call. Either way, incorrect installation voids most warranties and directly undermines filtration performance — the two outcomes this guide exists to prevent.
This guide walks through the complete installation sequence, from site preparation to post-startup validation, covering every step where shortcuts commonly cause problems.
Key Takeaways
- Install the unit in the return air duct, upstream of the blower and cooling coil
- Cut power at the main breaker — not the thermostat — before any ductwork or wiring work
- Use UL 181-listed tape or mastic for duct sealing; standard cloth duct tape fails over time
- Verify airflow direction arrows on every component before sealing the cabinet
- After installation, confirm indicator lights are active and listen for normal operation before signing off
Prerequisites and Safety Considerations
Confirm Compatibility Before Cutting Anything
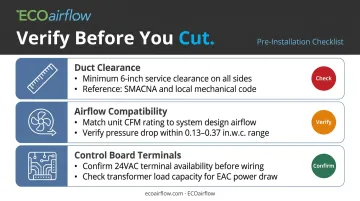
Before picking up tin snips, verify three things:
- Duct clearance: Your return air duct must provide enough access space to mount and service the unit. Check your unit's installation manual for the specific front-access clearance it requires — this varies by model and is not a universal figure. The 2021 International Mechanical Code specifies 30 × 30 inches for appliance service spaces, and NEC 110.26 requires at least 30 inches wide × 36 inches deep for equipment worked on while energized.
- Airflow compatibility: Match the unit's published CFM rating and pressure drop against your system's airflow. ECOairflow residential models (Dynamo 1", Model 1000, Model 1500) are available in all standard residential furnace cabinet sizes plus custom dimensions. Contact ECOairflow at 1-877-347-3569 or customerservice@ecoairflow.com for per-model CFM capacity data before sizing your duct opening.
- Control board terminals: Your furnace control board must have accessible 24VAC terminals. All ECOairflow residential units connect to a standard 24V floating input (18–30V range, 2 watts). Never assume terminal voltage from the label alone — a Carrier 58SB0A, for example, designates EAC-1 as 115VAC during blower operation. Always verify your board's schematic before connecting anything.
Required Safety Steps Before You Begin
Cut power at the main electrical panel before touching any wiring or metal components. A thermostat is a control signal only — it does not isolate energy. OSHA 1910.147 requires a lockable energy-isolating device with verified isolation before servicing begins.
Confirm the circuit is dead with a voltmeter. Don't rely on the panel label.
When to Stop and Call a Pro
Don't proceed if:
- Duct dimensions don't match the unit without gradual transitions (no more than 20 degrees per side per the Resideo F300 manual)
- The furnace control board has no identifiable low-voltage terminals
- You're unfamiliar with sheet metal cutting or low-voltage wiring
Tools and Materials Required
Tools
| Tool | Purpose |
|---|---|
| Drill/driver | Mounting screws |
| Tin snips | Cutting the duct opening |
| Voltmeter | Verifying terminals, confirming power is off |
| Wire strippers | Low-voltage wiring connections |
| Phillips and flathead screwdrivers | Cabinet and electrical work |
| Measuring tape + marker | Marking the cut line |
| Level | Confirming cabinet alignment |
| Safety glasses + work gloves | Required — sheet metal edges cut without warning |
Materials
- UL 181A or 181B-listed tape, or duct mastic — DOE Building America guidance specifies that duct sealing tapes must meet UL 181A or 181B standards. Standard cloth duct tape is not an acceptable durable seal.
- Self-adhesive gasket strips — for an airtight cabinet-to-ductwork fit
- Sheet metal screws — for securing the cabinet
- Flexible duct adapters — only if existing ductwork dimensions require transition pieces
What comes with the unit: The electronic cells or polarization pads and power components ship as part of the unit. Sealing materials, tools, and fasteners are installer-supplied. Before starting, open the box and cross-reference the packing list to confirm all components are present — contact ECOairflow at customerservice@ecoairflow.com if anything is missing.
How to Install an Electronic Air Cleaner: Step-by-Step
Installation follows a defined sequence. Skipping gasket sealing or rushing wiring connections are the two most common causes of post-startup failures — and both are difficult to diagnose once the system is running.
Estimated time: 1.5–3 hours for a standard residential installation.
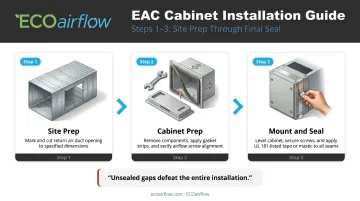
Step 1 — Prepare the Installation Site
With power confirmed off at the breaker:
- Identify the ideal location on the return air duct, adjacent to the furnace blower compartment and upstream of the cooling coil — this ensures all circulating air passes through before reaching the system and keeps the coil protected from particulate buildup.
- Using the unit's dimensional specifications, mark the duct opening precisely with a marker and measuring tape.
- Cut the opening with tin snips. Work carefully — sheet metal edges cut skin easily.
Step 2 — Prepare the Cabinet
Before mounting anything:
- Remove the prefilter and electronic cells (or polarization pads) from the cabinet
- Apply self-adhesive gasket strips around the full perimeter of the cabinet — this is the first line of defense against air bypass
- Check airflow direction markings on every component — all arrows must point in the same direction as airflow through your system. Misaligned components won't show up visually, but will show up in filtration performance
Step 3 — Mount and Seal the Cabinet
- Position the cabinet in the cut opening and confirm it is level before drilling anything
- Secure with sheet metal screws
- Seal every joint and seam between the cabinet and ductwork with UL 181-listed tape or mastic
ASHRAE's air-cleaner guidance is unambiguous on this point: air that bypasses the filter is not cleaned. A single unsealed gap defeats the entire installation.
If you're retrofitting an existing EAC cabinet — replacing a Honeywell F300, AprilAire 5000, Lennox PureAir, Trane CleanEffects, or Carrier Infinity unit — ECOairflow's Cabinet Conversion Kit can simplify this step. Its two-rail neodymium magnetic system attaches to the existing cabinet without drilling or cutting, and an ECOairflow unit drops directly into place.
Step 4 — Wire the Unit to the Furnace Control Board
Photograph the existing control board wiring before disconnecting anything. This takes one minute and prevents confusion during reconnection.
Using your voltmeter:
- Identify the 24VAC common (C) and hot (R) terminals — or dedicated EAC terminals if present
- Confirm actual terminal voltage against your furnace schematic. Do not assume voltage from the label
- Connect the unit's low-voltage leads per the manufacturer's wiring diagram
- Route the power cord away from moving parts
All ECOairflow residential units (Dynamo 1", Model 1000, Model 1500) use a 24V floating input compatible with standard residential furnace control boards. Model-specific wiring instruction PDFs are available at ecoairflow.com. If no suitable 24VAC terminal exists on your control board, a sail switch or separate transformer is required — contact a licensed HVAC technician at that point.
Step 5 — Reinstall Components and Restore Power
- Slide the prefilter and cells/pads back in — confirm arrow orientation one final time
- Close and fully latch the access door (the door safety switch must be fully engaged for the unit to power on)
- Restore power at the main breaker
Post-Installation Checks and Validation
Visual Checks Before Powering On
- Inspect all tape seams for complete, unbroken coverage
- Confirm the cabinet is firmly secured with no visible gaps
- Verify the access door is fully latched
Functional Testing
- Set the thermostat fan to "ON" (continuous) rather than "Auto" — this keeps the blower running so you can observe unit behavior
- Restore power at the breaker
- Check indicator lights per your unit's documentation. Consult ECOairflow's model-specific guide for what your indicators should display
- Listen for a soft snapping sound — this confirms the collector plates are charging correctly and is expected during initial startup
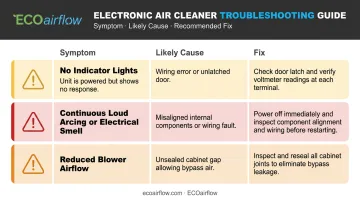
If something's wrong, it typically shows up as one of these:
- No indicator lights → wiring error, unlatched door, or breaker not fully reset
- Continuous loud arcing or strong electrical smell → misaligned components or a wiring fault; power off immediately
- Reduced blower airflow → likely an unsealed gap creating excess static pressure
If any of these symptoms appear and persist after a quick recheck, contact ECOairflow support before continuing operation.
Common Installation Problems and Fixes
Most post-startup issues come down to the same handful of culprits: bad seals, wiring mistakes, and parts installed in the wrong orientation.
Unit Not Powering On
Symptoms: No indicator lights after power is restored
Likely causes:
- Access door not fully latched (disengages the safety switch)
- Wiring connected to wrong terminals
- Breaker not fully reset
Fix: Confirm the door is firmly closed. Use a voltmeter to verify 24VAC is reaching the unit's input terminals. Cross-reference wiring against both the furnace schematic and the unit's wiring diagram.
Excessive Arcing or Electrical Discharge
Symptoms: Continuous loud zapping or sparking beyond the normal initial snap
Likely causes:
- Collector plates or cells were not completely dry when reinstalled
- Bent plates making contact
- Broken ionizing wire
Fix: Power off at the breaker. Remove cells, inspect for bent plates or damaged wires, and ensure every component is completely dry before reinstallation. Occasional particle-related snapping during normal operation is expected. If the arcing is continuous or loud, that points to a physical defect or moisture — not normal function.
Air Bypassing the Cleaner
Symptoms: Unit is running but visible dust or high particulate levels persist
Likely cause: Incomplete sealing — gaps between the cabinet and ductwork, or gasket strips not applied around the full cabinet perimeter
Fix: Power off, inspect all joints visually and by feel for air movement, apply additional UL 181-listed tape or mastic over any unsealed seams. Run your hand slowly along every cabinet edge while the system is running — any airflow you feel is a bypass point that needs sealing.
Pro Tips for an Effective Installation
Sequence ductwork before wiring. Complete all sheet metal cutting, fitting, and sealing before reconnecting any wiring. Debris near an open control board is a hazard. Also confirm the unit is level before drilling screws — a misaligned cabinet strains the ductwork connection over time.
Choose the right unit first. For residential applications, look for independently certified MERV performance, UL 2998 Zero Ozone compliance, and a low pressure drop that won't strain your HVAC system. ECOairflow's lineup covers both residential and commercial needs:
| Model | Application | MERV | Pressure Drop | Certification |
|---|---|---|---|---|
| Dynamo 1" | Residential | 12 | 0.11 in.w.c. | UL 2998 Zero Ozone |
| Model 1500 | Residential | 12 | 0.13 in.w.c. | UL 2998 Zero Ozone |
| Model 1000 | Residential | 11 | 0.18 in.w.c. | UL 2998 Zero Ozone |
| Model 2300 | Commercial | 13–16 | 0.13–0.37 in.w.c. | ASHRAE 52.2 |
| M-Series Hybrid | Healthcare | 13–16 | 0.13–0.37 in.w.c. | ASHRAE 52.2 / ASHRAE 170 |
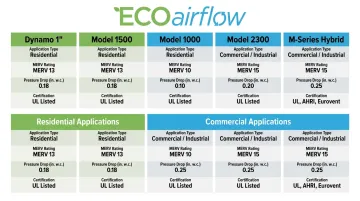
All residential models connect directly to the standard 24V furnace control circuit.
Document everything. Photograph the control board before disconnecting wiring. Record the installation date. Register the product warranty — ECOairflow offers a 5-year warranty on the Model 1000 and 1500, and a lifetime electronics warranty on the Dynamo 1". ECOairflow's warranty terms may require installation documentation for certain claims, so keep a record of who performed the work.
Conclusion
Installation quality determines filtration performance — full stop. A poorly sealed or incorrectly wired unit may run for months while delivering little measurable air quality benefit. The steps covered here — correct placement, airtight sealing, verified wiring, and post-startup validation — aren't optional extras. Skip any one of them and you're paying for equipment that isn't doing its job.
Approach the project methodically, use the right tools, and don't hesitate to bring in a qualified HVAC technician when any step falls outside your comfort level. Once installed correctly, your next step is simple: replace the filter pad on schedule — every three months for residential systems — and the unit will keep performing at its rated MERV level for years to come.
Frequently Asked Questions
Do electronic air cleaners work better than standard air filters?
Electronic air cleaners use electromagnetic attraction rather than physical barrier filtration, capturing far smaller particles than standard pleated filters. ECOairflow's Model 1000, for example, captures particles down to 0.001 microns. Replaceable pads also tend to cost less over time than recurring disposable filter purchases.
What is the best electronic air cleaner?
The right unit depends on your HVAC system size and air quality needs. Look for independently certified MERV performance (tested per ASHRAE 52.2), zero ozone compliance (ETL-listed to UL 2998), and a low pressure drop rating. Higher pressure drop strains your blower motor and increases energy costs over time.
Where should I install an electronic air cleaner in my HVAC system?
Install the unit in the return air duct, adjacent to the furnace blower compartment, upstream of both the blower and the cooling coil. This ensures all circulating air passes through the cleaner before entering the system, and protects the coil from particulate accumulation.
How often should I replace my electronic air cleaner pads?
ECOairflow recommends replacing pads every 3 months across all residential models. Households with pets, high occupancy, or exposure to wildfire smoke may benefit from more frequent inspection — visible pad discoloration is a reliable sign that replacement is due early.
Can I install an electronic air cleaner myself, or do I need a professional?
Experienced DIYers comfortable with sheet metal work and low-voltage wiring can complete a standard residential installation in 1.5–3 hours. Those unfamiliar with furnace control boards or ductwork should hire a licensed HVAC technician, as wiring errors and poor sealing are difficult to diagnose and can reduce filtration performance.
Will an electronic air cleaner produce ozone?
Some older or undersized units can produce trace ozone. Choosing a unit independently certified to UL 2998 zero ozone standards removes that risk. UL 2998 applies a detection limit of 0.005 ppm, ten times stricter than California's CARB threshold of 0.050 ppm for in-duct air cleaners. ECOairflow's entire residential and commercial lineup carries this certification.